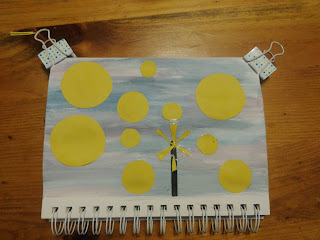
Welcome back to my blog! I was inspired by the photo in my last post to create this awesome piece of art. Here's the comparison of theirs to mine:
Here's how to make it! You will need:
- a few small, round things to trace
- watercolor paint + brush (you don't need anything fancy, Target sells a huge set for $3.99.)
- bowl for water (mine is from Joanna Gaines's line at Target. It's the perfect size!)
- a mixed-media sketchbook or watercolor paper (Target sells sketchbooks for around $6.00)
- yellow construction paper
- Elmer's glue
- scissors
I also like to clip down the edges of my paper so it doesn't curl up. I just used standard sized binder clips for this, but you can use tape if you're doing this on a regular sheet of paper.
Paint on your purple and blue. It's supposed to look blended, so don't bother washing your brushes out between colors.
Using a black permanent marker, draw the shaft of your sparkler. You could use a Crayola marker, but make sure your watercolor is fully dry before applying so that it doesn't bleed.
Then, cut out circles from your yellow construction paper to be the bokeh. I traced a small drinking glass, a milk cap, and a washer ring. I also cut out some small triangles for the sparks.
Experiment with the placement of your circles. I put the smaller ones closer to the sparkler, getting progressively bigger as they go farther out. Once you're happy with the placement, put a small dot of glue on the underside of each one.
And you're done! I love how mine turned out.
Thanks for joining me today on How To Be Fearless. Hope to see you next time!
-Adrienne


Comments
Post a Comment